
How to Create a WooCommerce Landing Page With AI
How to · WooCommerce
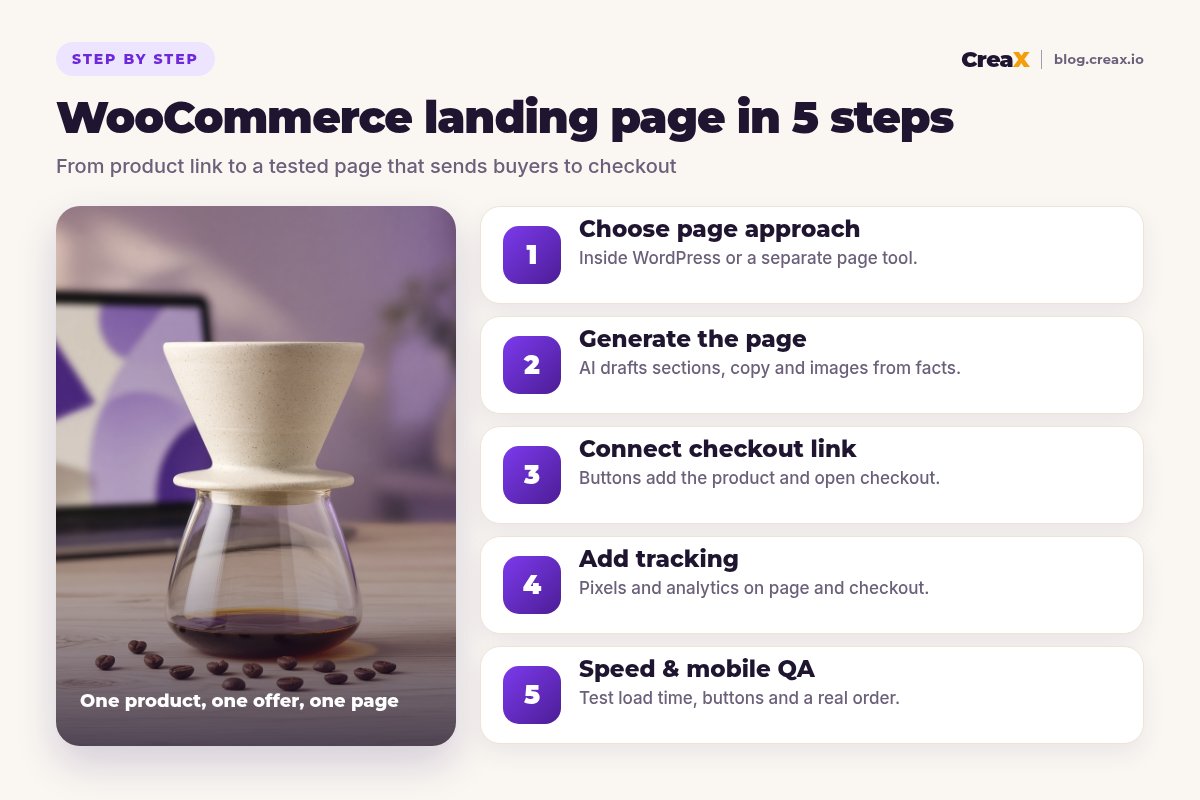
A WooCommerce landing page is a single, focused page that takes ad traffic from one promise to your checkout, without the menus and side paths of a normal shop page. This guide shows how to build one with AI in five steps: choose where the page lives, generate it from real product facts, connect the buy button to WooCommerce checkout, add tracking, and test speed and mobile before you spend.
Updated October 2026 · By the CreaX team
Key takeaways
- ✓Decide first: build the page inside WordPress with your page builder, or generate it with an external AI page tool and send the button to WooCommerce checkout. Both work.
- ✓WooCommerce has built-in links that add a product to the cart and open checkout, so a landing page can live almost anywhere.
- ✓AI drafts the structure, copy and images fast. Prices, claims, reviews and policies come from you.
- ✓Most launches break on two things: the checkout link and the pixel. Test both with a real order before any ad goes live.
In this guide
The goalWhat you'll have at the end
By the end you will have one landing page for one product and one offer, built from verified product facts, with a headline that repeats your ad's promise, a buy button that drops the product into your WooCommerce cart and opens checkout, working tracking from page view to purchase, and a page that loads quickly on a phone. You will also have a repeatable process, so the next product takes far less time.
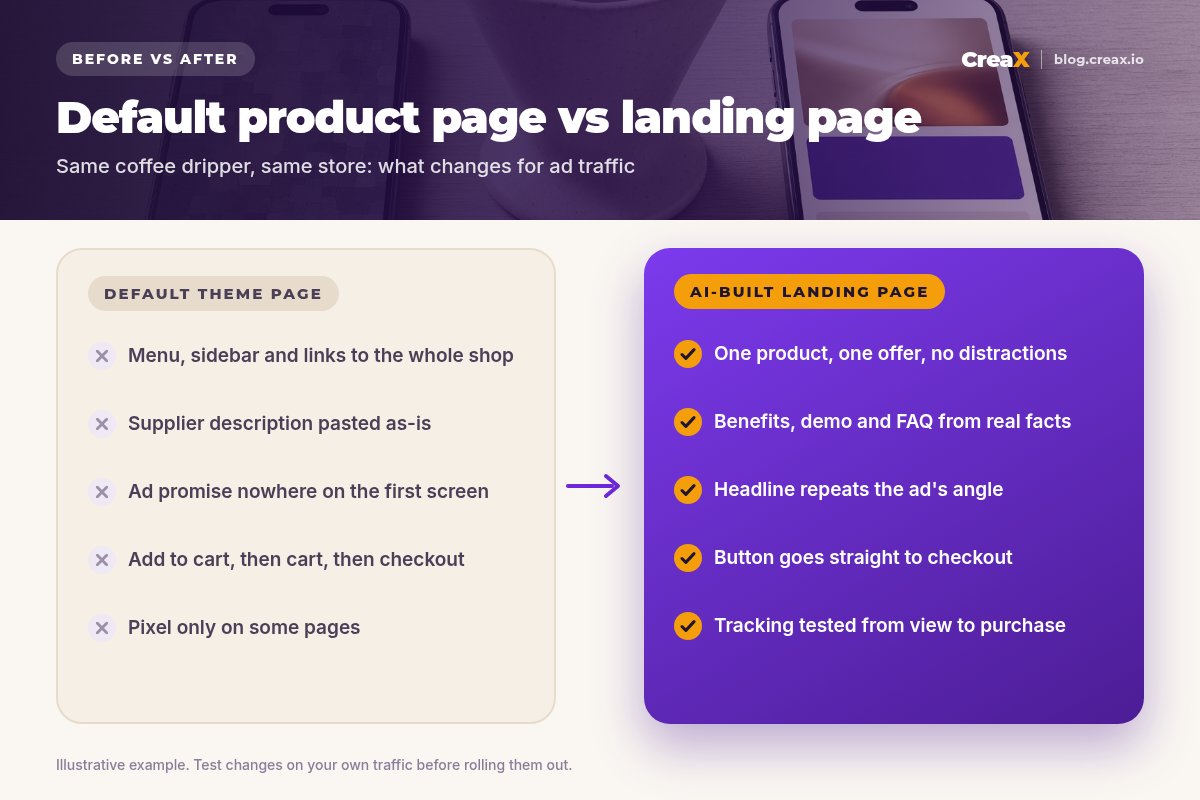
Why bother when every WooCommerce product already has a product page? Because a default product page is designed for browsing: header menu, sidebar, related products, reviews tab, links to the rest of the shop. That is useful for returning customers. For a cold visitor who tapped one ad, every extra link is a way out. A landing page keeps them on one story and one action.
PrepWhat you need before you start
- A working WooCommerce store with the product created, priced and in stock, plus payment and shipping set up.
- A product fact sheet: what it is, materials, dimensions, what's in the box, what it does, who it's for, and your shipping and returns policy.
- The ad angle you plan to test, in one sentence. The page headline will repeat it.
- Honest product photos, at least one true-to-life shot, and a short product video if you have one.
- An AI tool: an AI page generator, the AI features in your WordPress page builder, or a general AI assistant for copy.
!Facts in, or fiction out
DecideStep 1: Choose the page approach
There are two practical ways to build a landing page for a WooCommerce store. Neither is “correct”; pick the one that fits your setup and skills.
| Inside WordPress | External AI page | |
|---|---|---|
| Where it lives | A page on your WooCommerce site, built with your theme's block editor or a page builder plugin | A page generated and hosted by an AI page tool |
| Checkout | Native WooCommerce buttons or blocks on the page | Button links to a WooCommerce add-to-cart or checkout URL |
| Strengths | Same domain, full control, uses your existing plugins | Fast to generate and iterate, no plugin weight on your site |
| Watch out for | Theme and plugin bloat slowing the page down | Different domain or design from the store, so check trust and tracking |
| Good for | Stores with a solid builder and a developer or patient owner | Fast product tests, many angles, small teams |
Both approaches can send buyers to the same WooCommerce checkout. Many stores use both: external pages to test, WordPress pages for winners.
If you're unsure, a simple rule: test fast externally, rebuild winners in WordPress if you want them on your own domain long term. Our roundup of the best AI landing page generators for ecommerce compares tools for the external route.
DraftingStep 2: Generate the page
Whichever route you chose, the page should follow an order that answers a cold visitor's questions in sequence:
- Hero: headline that repeats the ad's promise, one line of support, product image or short clip, price and buy button.
- Benefits: three to five, each tied to a real feature.
- In use: images or video of the product doing its job.
- Proof: real reviews, customer photos used with permission, or a guarantee you honor. Nothing invented.
- Details: specs, materials, what's in the box.
- FAQ: shipping, returns, sizing, compatibility, care.
- Final call to action: price and button again.
With an AI page generator
With a tool like CreaX, you paste the product link or upload a product image and get a publish-ready landing page in about 60–120 seconds, along with studio ad creatives and UGC-style video ads built around the same product. That last part matters: your ads and your page start from one story. Then you edit the draft against your fact sheet. Our walkthrough on turning a product link into a landing page without a designer shows the flow.
Inside WordPress
If you build in WordPress, use AI for the words and visuals, then assemble the sections in the block editor or your page builder. Give the assistant your fact sheet and the section order above, and ask for short paragraphs, benefits first and specs as a list. Many page builders now include AI writing helpers too; the rule is the same: facts first, then draft, then check.
Get the landing page and the ads in one pass
CreaX turns a product link into a publish-ready landing page, studio creatives and UGC-style video ads, so the page and the ads tell the same story.
CheckoutStep 3: Connect the checkout link
This is the step that makes an external page work with WooCommerce. WooCommerce supports links that put a product in the cart for the visitor, so your landing page button doesn't have to send people to the product page first. WooCommerce documents two options:
| Link type | Format (replace with your store and IDs) | What it does |
|---|---|---|
| Add-to-cart URL | yourstore.com/checkout/?add-to-cart=ID&quantity=1 | Adds the product and opens the checkout page |
| Shareable checkout URL | yourstore.com/checkout-link/?products=ID:1 | Fills the cart (several products and an optional coupon) and goes to checkout |
Formats from WooCommerce's own documentation. Shareable checkout URLs need a recent WooCommerce version; check the docs for yours.
- Find the product ID in WooCommerce → Products: hover over the product name and the ID appears under it.
- For variable products (sizes, colors), use the variation ID, found in the product's Variations section. One button per variation, or a short variant picker that changes the link.
- Bundles: a shareable checkout URL can add several products at once, and a coupon parameter can apply a real discount code you created.
- Check your page tool: before committing to an external page tool, confirm it lets you set a custom URL on the buy button.
- Inside WordPress, you can simply use WooCommerce's own add-to-cart button or blocks on the page instead of a custom link.
★Test every button, not just the first one
MeasureStep 4: Add tracking
Without tracking, you can't tell which ad, angle or page actually produced sales. You need two kinds of signal:
- On the landing page: a page view for every ad platform you run (for example the Meta pixel or the TikTok pixel), plus analytics such as GA4.
- On WooCommerce: checkout and purchase events. Meta, TikTok and Google each offer an official WooCommerce extension that sends store events; install the ones for the platforms you use.
- UTM parameters on every ad link, so analytics shows which campaign, ad set and creative sent each visit.
If the landing page lives on a different domain from your store, make sure the same pixel IDs are on both, and use each platform's test or diagnostics tool to confirm events arrive. A page that gets clicks but no recorded sales is often a tracking gap, not a creative problem. If clicks turn into views but not sales, our guide on TikTok ads with views but no sales covers the other usual suspects.
TestStep 5: Speed and mobile QA
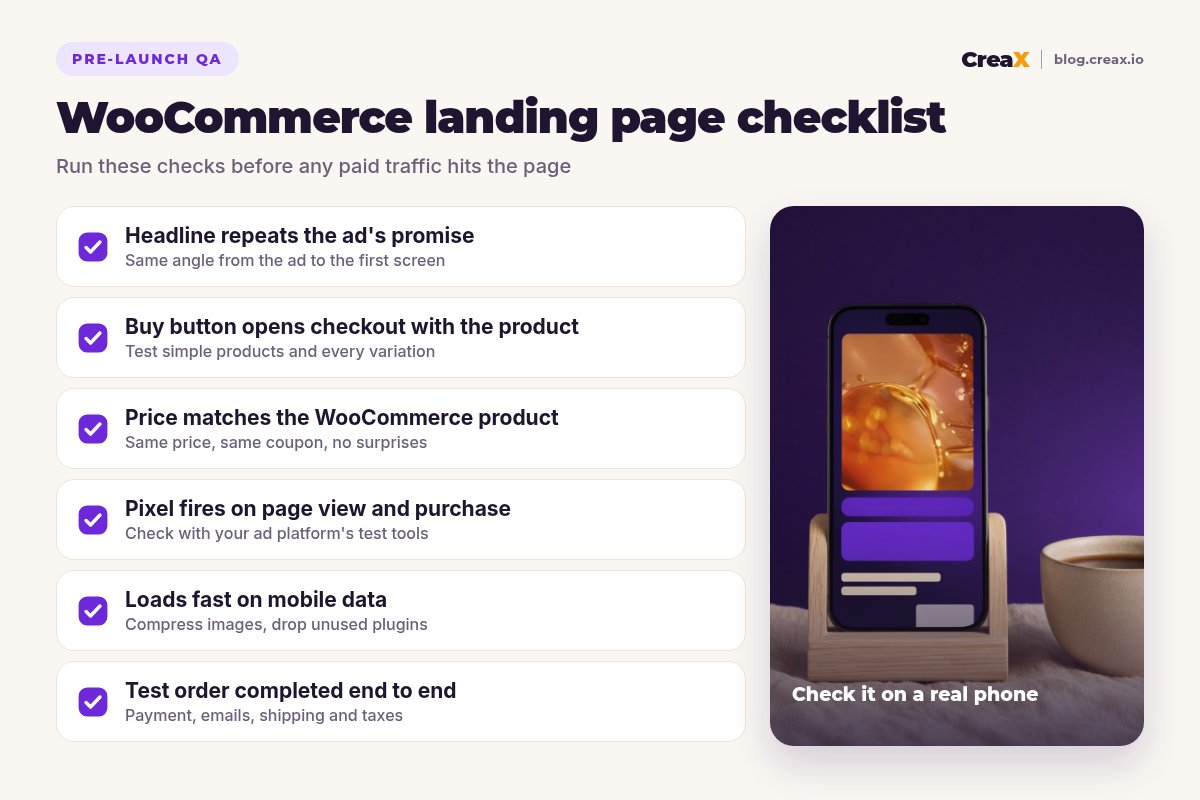
Most paid social traffic arrives on phones, often on mobile data. Test like a buyer who just tapped your ad:
Check the first screen
Measure speed
Tap every element
Place a real test order
Confirm tracking
Build your next WooCommerce landing page from one link
Paste a product link and get a landing page, studio creatives and UGC-style video ads in about 60–120 seconds. Then wire the button to your checkout and launch.
ExampleWorked example: a ceramic pour-over dripper
Say you sell a handmade ceramic pour-over coffee dripper on WooCommerce and want to test the angle “café-quality coffee at home without a machine”. Here's how the five steps play out:
| Step | What you do | Result |
|---|---|---|
| 1. Approach | Test externally first, since the store theme is heavy and the angle is unproven | Decision: external AI page |
| 2. Generate | Generate from the product link, then edit against the fact sheet (clay type, cup size, filter type, care) | Hero, benefits, brewing steps, FAQ |
| 3. Checkout | Main button uses the add-to-cart URL; a bundle button adds dripper + filters via a shareable checkout URL | Two buttons, both tested |
| 4. Tracking | Same Meta pixel on the page and the store, UTMs on every ad | Page views and purchases recorded |
| 5. QA | Speed test, tap test, one real order, events confirmed | Ready for a small ad test |
Illustrative example. Use your own verified product facts and policies.
If the angle wins, rebuild the page in WordPress on your own domain using the same structure and copy, or keep the external page and keep iterating. Either way, the AI handled the drafting; the price, the bundle, the proof and the checkout wiring came from you.
MistakesMistakes to avoid
- Sending ads to the shop homepage. The visitor has to find the product. Send them to the page built for the ad.
- Parent product IDs for variable products. Use variation IDs or the cart may fail to add the right item.
- Price mismatch. The page says one price, checkout shows another. Update both whenever you change pricing.
- Invented proof. AI-written reviews and ratings put your store and ad accounts at risk.
- Pixel on the page but not the store (or the reverse). You lose the link between ad and sale.
- Plugin overload. Every slider, popup and widget adds weight. Landing pages should be light.
For more on what goes on the page itself, see our FAQ on what makes a high-converting product page, and for getting a full test live quickly, our guide to launching a product test in 24 hours.
Copy thisChecklist
Before you send traffic
- ✓Fact sheet written: specs, what's in the box, offer, shipping, returns
- ✓Ad angle chosen; headline repeats it
- ✓Page approach chosen: inside WordPress or external AI page
- ✓Draft generated from facts only, then every claim checked
- ✓Real price and real discount only; matches the WooCommerce product
- ✓Every buy button tested, including each variation and bundle
- ✓Pixels on the landing page and the store; UTMs on every ad
- ✓Speed tested on mobile; heavy images and unused scripts removed
- ✓One real test order completed end to end
- ✓Purchase event confirmed in each ad platform
FAQFrequently asked questions
Q.Do I need a page builder plugin to make a WooCommerce landing page?
Q.Can a landing page on another domain sell WooCommerce products?
Q.Should I send ads to the product page or a landing page?
Q.Will an AI-written page hurt my SEO?
Q.How many landing pages should I make per product?
Q.Can CreaX publish directly into WooCommerce?
Ready to test your next product?
One product link, about 60–120 seconds: a landing page, studio creatives and UGC-style video ads that tell the same story.
This guide is published by CreaX. It describes WooCommerce features from WooCommerce's own documentation as of October 2026 and contains general best practices, not guaranteed results. Check WooCommerce's docs for your version.